Goblin Cave Battle Map: Layout, Encounters, and Six Prompts
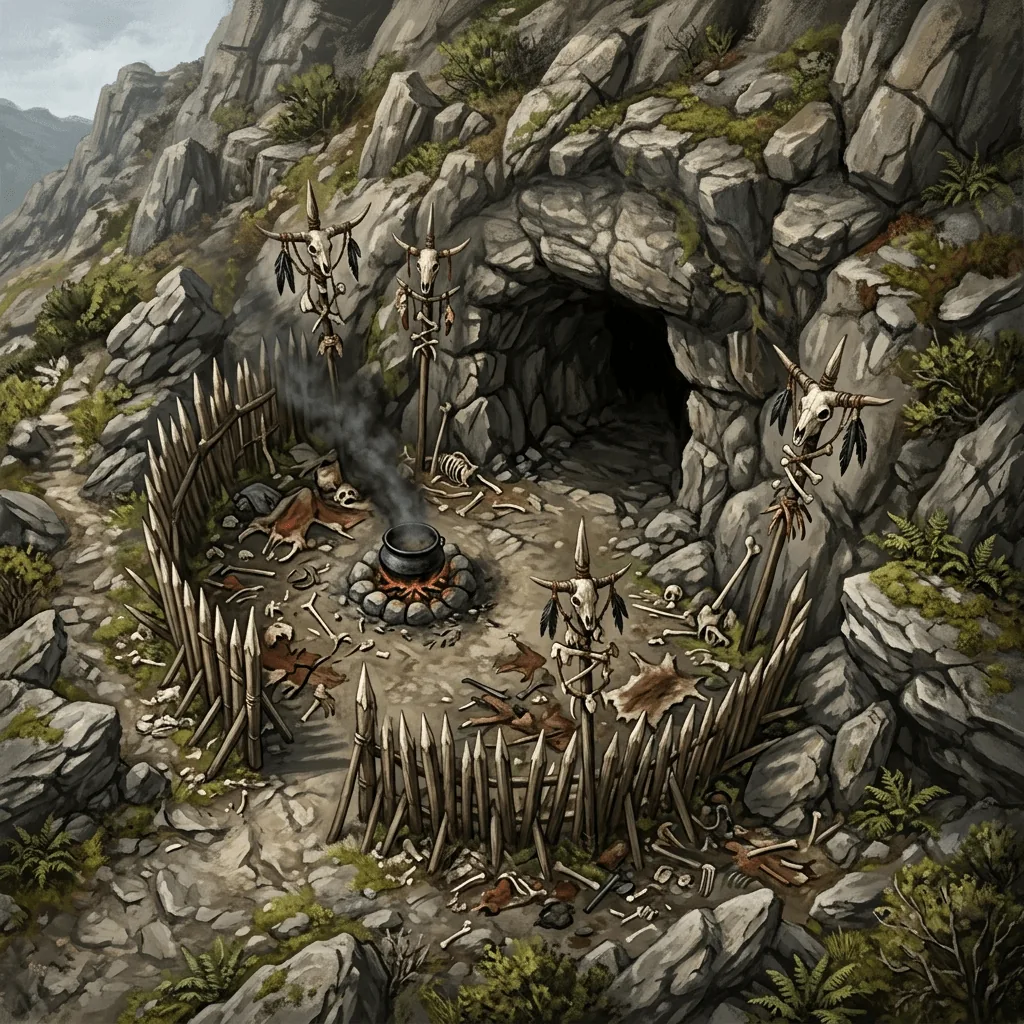
The goblin cave is the front door of the hobby. It is where an enormous share of campaigns begin, where most new Game Masters run their first real dungeon, and where a generation of players learned that a low ceiling and a bad smell mean you are about to be outnumbered. It is also, in practice, the encounter most often run on a blank rectangle, because the map you wanted did not exist and the session was in an hour.
This guide fixes that. Here is how to lay out a goblin lair that plays well, what each area is for, and six prompts you can paste into a generator to get the map you actually described.
How big should a goblin cave be?
A goblin lair for a first tier party works best at about 25 x 25 to 30 x 30 squares in total, split across three to five connected areas rather than drawn as one big cavern. Individual chambers want to be roughly 10 to 15 squares across, which is small enough that goblins can swarm and large enough that the party can spread out. Keep tunnels between chambers at one or two squares wide so they function as chokepoints, since a goblin warren where everything is open is just a field with a roof.
The five areas of a goblin lair
A lair that feels like a place rather than a set of rooms usually has these five parts. You do not need all of them, but you should be able to say which one each chamber is.
The approach. Outside the cave mouth: a crude palisade of sharpened stakes, a cooking fire, bone totems, maybe a scraggly hide tent. This is where the party gets seen and where you decide whether the whole lair knows they are coming. Fighting here is open ground with sightlines, the opposite of everything after it.
The guard post. Just inside the entrance, where the tunnel narrows. A rickety platform above the passage, an alarm gong or a rope of tin cans, a crude murder hole. This area exists to punish walking in the front door and to give the party a reason to look for a back way.
The warrens. The living space: sleeping pits, filthy bedding, cooking pots, a pen with something unhappy in it. This is where the map does its worldbuilding, and it is also where the non combat encounters live, because a goblin camp full of noncombatants is one of the better moral complications a low level party will meet.
The choke. A rope bridge over a fissure, a narrow ledge, a collapsed section with a single gap. One hard tactical feature in the middle of the lair that forces a decision. This is the chamber your players will remember.
The boss chamber. Bigger, taller, and decorated with whatever the chief has stolen. A raised ledge, a throne of scrap, a war drum, a captive or two. Give it a second exit, because a chief with an escape route makes a much better recurring villain than a chief who dies in round three.
If you want a formal structure to hang this on, our guide to the 5-room dungeon method maps almost exactly onto those five areas.
Terrain that makes goblins dangerous
Goblins are individually weak and tactically nasty, and the map is what lets them be nasty. Four features do most of the work.
Ledges and upper tunnels. A goblin on a ledge ten feet up with a short bow is a much bigger problem than a goblin on the floor. Put at least one raised firing position in the lair.
Squeezes. Tunnels that goblins move through freely and larger characters have to squeeze through are the reason the lair belongs to them. One narrow tunnel per map is plenty.
Crossing sightlines. Cave chambers with irregular walls create pockets of concealment and abrupt corners, which suits ambushers and frustrates parties that want to fight in a line.
Something to knock over. Cooking fires, a stacked woodpile, a poorly supported ceiling beam, a penned animal. Give the party one lever and they will find three uses for it.
Six goblin cave prompts
Each entry gives the scene, its role in the lair, and a prompt to paste straight in.
1. The stockade entrance
- Role: The approach. Open ground, first contact, a chance to be seen.
- Prompt: "Top-down battle map of a goblin cave entrance in a rocky hillside, crude palisade of sharpened wooden stakes, smoking cooking fire with a stew pot, bone and skull totems on poles, scattered refuse, a dark tunnel mouth in the rock face, overcast daylight, gridless digital art."
2. The guard tunnel
- Role: The choke just inside the door, with a way to raise the alarm.
- Prompt: "Top-down battle map of a narrow cave tunnel with a rickety wooden guard platform built above the passage, a hanging alarm gong, crude ladders, piles of rubble as cover, guttering torches on the walls, deep shadow, gridless digital art."
3. The sleeping warren
- Role: The living space, packed with noncombatants and clutter.
- Prompt: "Top-down battle map of a goblin warren cavern, dozens of filthy bedding pits dug into the floor, hanging hide curtains dividing the space, a central fire pit, stacked crude weapons and stolen sacks, low uneven ceiling, dim orange firelight, gridless digital art."
4. The fungus grotto
- Role: A visually distinct middle chamber with hazard terrain.
- Prompt: "Top-down battle map of a damp cave chamber filled with giant pale mushrooms and glowing blue fungus, shallow pools of still water, slick mossy rock, a narrow path winding between the fungal clusters, eerie bioluminescent light, gridless digital art."
5. The rope bridge fissure
- Role: The choke. The chamber the party will talk about afterwards.
- Prompt: "Top-down battle map of a deep cave fissure crossed by two crude rope and plank bridges, narrow ledges running along both walls, a dark drop below, jagged stalagmites, torchlight from opposite sides of the chasm, gridless digital art."
6. The chief's hall
- Role: The boss chamber, with elevation and a back door.
- Prompt: "Top-down battle map of a large goblin chieftain's cave hall, a raised rock ledge with a throne of scavenged scrap and furs, a huge war drum, stolen crates and barrels along the walls, a wolf pen with a gate, two tunnel exits, smoky torchlight, gridless digital art."
Those prompts follow the structure our prompt formula guide lays out: name the space, name the cover, name the light. If you want more ready made scenes in this style, the 50 prompt collection has a wide spread of them.
Running the lair as one continuous location
The reason to build all five areas rather than one cave is that a goblin lair plays best as a running fight. Goblins do not stand and die. They fall back, they shout, they pull the bridge, they come around through the side tunnel. If your map is one chamber, none of that can happen and the encounter is a slugging match.
Prep the areas as separate maps and move between them as the party pushes in. On a virtual tabletop this is a few clicks, and on a screen laid flat in your table it is one click. Our guides to Owlbear Rodeo and Foundry both cover scene switching, and our TV battle map guide covers the physical version.
One more idea worth stealing: generate the boss chamber twice, once intact and once after something has gone wrong, and swap the map when it does. Regenerating one region of a finished map is the fastest way to get a matching pair, and a chamber that visibly changes mid fight is the kind of thing players still mention two campaigns later.
If the party clears the cave and follows the trail to whoever was paying the goblins, our bandit camp layout guide has the next site, and our boss arena battle map ideas cover what the chief's hall could become in a later arc.
Every campaign's first dungeon deserves better than a rectangle. Sign up for the Text to Tabletop app, use your 3 free tokens, and build the cave your opening session actually described.
Tyler V
Lead Developer and UX Designer at Text to Tabletop. Passionate about helping GMs and players create better TTRPG experiences.
Ready to Forge Your Next Battle Map?
Describe the encounter and get a grid-aligned, top-down battle map in seconds, then regenerate any area until it matches your vision.
Generate Your First Map Free3 free map tokens · no credit card required