How to Make AI Battle Maps: A Complete Step-by-Step Tutorial
You have probably seen the gorgeous fantasy environments floating around social media and thought about how incredible they would look on your virtual tabletop. Then you actually sat down to type a prompt, and the result was an isometric mess, a map covered in baked-in grid lines that do not match your VTT, or an image filled with random, ghostly tokens. Learning how to make AI battle maps that are actually functional for tactical play takes more than just typing a cool description. This complete step-by-step tutorial will guide you through the process of generating flawless, encounter-ready environments on your very first try. If you are brand new to the technology, our game master's guide to text-to-map AI explains how these generators work under the hood.
Step 1: Define the Encounter Before You Generate
Great encounter design drives the prompt: the prompt should never dictate the encounter. Before you open a generator, you need to know exactly what purpose this environment serves for your party. If you start generating without a plan, you will end up with beautiful landscapes that offer zero tactical depth.
Consider the classic elements of a memorable tabletop RPG combat scenario:
- Cover: Where can the ranged characters hide?
- Hazards: Are there rivers of lava, sheer cliffs, or patches of difficult terrain?
- Choke Points: Where will the frontline fighters clash to protect the spellcasters?
Spend two minutes sketching a mental layout of the combat area. If you need a ruined temple where cultists are channeling dark magic, your map needs a central altar, broken pillars for cover, and clear avenues of approach. Knowing these requirements beforehand ensures your text prompts target specific, functional layout elements rather than generic scenery.
Step 2: Choose the Right Tool
When learning how to make AI battle maps, the software you choose determines about eighty percent of your success. You can use generic image generators like Midjourney or DALL-E, but these tools were built for portraits and landscapes. They do not understand the strict mechanical requirements of a tabletop RPG. You will spend hours fighting their algorithms, trying to force a true top-down perspective or begging the AI to stop drawing random heroes on the canvas.
Specialized tools remove this frustration entirely. When you use the Text to Tabletop generator, the system is fundamentally tuned for Game Masters. It features an automatic 90-degree top-down lock, ensuring your output is always perfectly flat and ready for tokens. Furthermore, it incorporates automatic grid and NPC stripping. This means you will never have to manually edit out baked-in, distorted grid squares or random monster figures that confuse your players. Specialization saves you time during session prep, turning a twenty-minute Photoshop cleanup project into a single click.
Step 3: Write a Structured Prompt
The secret to a flawless generation lies in how you structure your text. If you throw a disorganized paragraph at an AI, it will prioritize random words and ignore the rest. To create an excellent environment, you should split your prompt into three distinct layers: structural, environmental, and atmospheric.
1. Structural Layer
This layer establishes the perspective and the baseline rules of the image. It tells the AI exactly how to position the camera and what to exclude. You want to explicitly state the camera angle and forbid characters.
2. Environmental Layer
This is the core of your map. Here, you describe the physical materials, the terrain features, and the tactical elements you planned in Step 1. Use concrete nouns like stone tiles, wooden tables, and iron grates instead of vague adjectives.
3. Atmospheric Layer
This layer sets the mood, the lighting, and the artistic style. Whether you want a grimdark aesthetic for a dark fantasy system or a clean, hand-drawn look for a fifth edition compatible module, this is where you specify those details.
Here is an example of a complete, structured prompt following this exact framework:
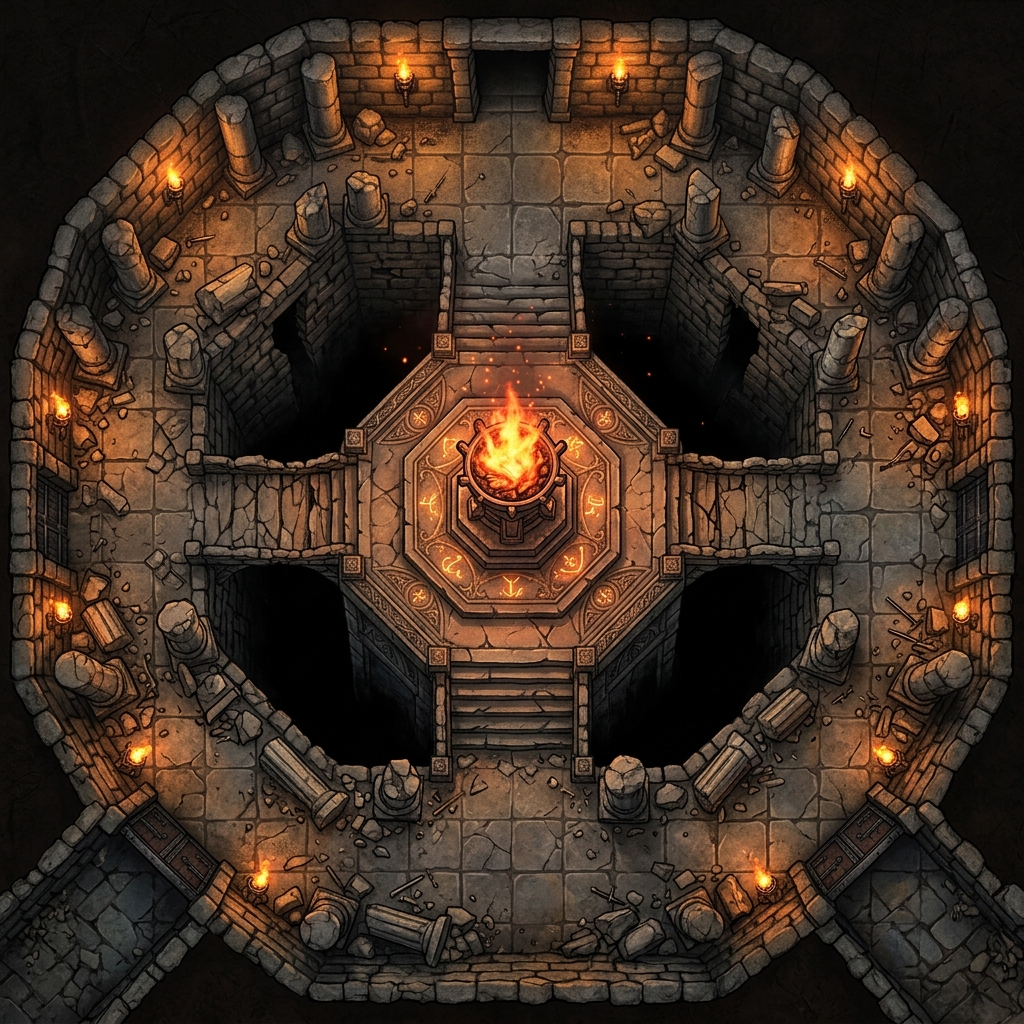
[Structural] Top-down battle map, overhead view, flat 2D perspective, no characters, no tokens, no grids. [Environmental] An ancient stone dungeon chamber with a central obsidian altar, glowing purple arcane runes etched into the floor, crumbling stone pillars for cover, deep chasms splitting the room. [Atmospheric] Dim torchlight casting long shadows, dark fantasy art style, hand-drawn texture, gritty, 4k resolution.
By separating your thoughts this way, the AI understands the physical boundaries before it fills in the artistic details. For an even deeper look into engineering the perfect description, check out our guide on the perfect AI map prompt.
Step 4: Generate and Iterate
Once you hit the generate button, view your first result as a baseline rather than a final product. The golden rule of AI generation is to change only one variable at a time during iteration.
If you like the layout of a ruined tavern but the lighting is too bright, do not rewrite the whole prompt. Keep the exact same text, delete the word "bright," and replace it with "shadowy candle light." If you change the lighting, the terrain, and the art style all at once, you will never learn which word actually fixed the problem.
If a map is completely off-target, it is often better to reroll the prompt entirely to see a fresh interpretation. However, if the layout is ninety percent perfect, adjust a single word in your environmental or atmospheric layer to fine-tune the final image.
Step 5: Export at the Right Resolution
Do not let your beautiful artwork turn into a blurry, pixelated mess when you upload it to your game. Understanding image resolution is crucial for a smooth virtual tabletop experience.
Virtual tabletops calculate image sizes based on pixels per grid square, which corresponds to pixels per inch (PPI).
- Minimum Resolution: 70 PPI is the bare minimum for most standard VTTs to keep the image from looking like a pixelated blur.
- Ideal Resolution: 100 to 150 PPI is the sweet spot. This range keeps your textures looking sharp and clean, even when players zoom in close to check their sightlines during a tense firefight.
When exporting your file from the Text to Tabletop web app, ensure you select a high-resolution export. Keep an eye on your final file size as well; large PNG files can cause loading lag for players with slower internet connections. Compressing the file into a modern WebP format is a fantastic way to retain pristine detail while keeping the file size incredibly small.
Step 6: Import to Your Virtual Tabletop
Now that you have your clean, high-resolution image, it is time to bring it into your digital campaign manager. Because specialized tools strip away unwanted grids and artifacts, aligning your map will be significantly easier than working with stock art.
When you upload the map into software like Roll20, Foundry VTT, or Alchemy, create a new scene and set the grid dimensions to match the pixel count you chose during export. If you exported your map at 100 pixels per square, set your VTT grid cell size to 100 pixels. From there, use the VTT alignment tool to stretch the edges of the image until the digital lines lay perfectly over the terrain features. For a detailed walkthrough on setting up lighting walls, doors, and line of sight, read our comprehensive tutorial on how to use AI maps in VTT systems.
Common Mistakes to Avoid
Even experienced Game Masters fall into predictable traps when they start using AI tools. Keep these common mistakes in mind to save yourself hours of wasted prep time:
Over-Cluttered Prompts
More words do not automatically equal a better map. If you type "a tavern with seventeen chairs, three barrels of ale, a dog sleeping by the hearth, a broken window, and a spilled mug of beer," the AI will experience information overload. It will likely mash those objects together into illegible shapes. Stick to the primary structural elements and let the art style fill in the minor details.
Asking for Grids
It is incredibly tempting to include the word "grid" in your prompt, but you should avoid this entirely. General AI generators cannot draw mathematically perfect squares. They will warp, bend, and shift across the canvas, making it impossible to align with your VTT. Let your virtual tabletop handle the grid overlay; keep your source image completely clean.
Requesting Characters or Monsters
Never include words like "goblin," "wizard," or "fighter" in your prompt unless you want permanent, unmovable figures baked directly into the ground textures. Your battle maps should be completely empty stages waiting for your players' tokens.
Vague Material Descriptions
Avoid abstract descriptions like "an epic room" or "a spooky cave." The AI does not know what "epic" looks like. Instead, use specific material callouts: "a vaulted cathedral ceiling with stained glass windows" or "a damp limestone cavern with dripping stalactites."
Level Up Your Prep
Learning how to make AI battle maps is one of the fastest ways to elevate your TTRPG sessions and cut your weekly preparation time in half. By structuring your prompts, focusing on tactical layouts, and using specialized tools that automatically handle perspective locks and grid stripping, you can build immersive worlds for your players in seconds. The same workflow powers convention games and one-shots - see our Free RPG Day prep guide for a worked example of building an entire session this way. Stop wrestling with generic image generators and start building your next dungeon layer by visiting the Text to Tabletop app today.
Tyler V
Lead Developer and UX Designer at Text to Tabletop. Passionate about helping GMs and players create better TTRPG experiences.